

UPDATED 7/9/2014: This has been tested and is SUPPORTED by VMware Engineering!
I got this question the other day, and decided to just test it out. The premise seemed sound but I wanted to see if anything would fail in the process of replication using a live cloned copy of the virtual machine in question. Here is why I wanted to do this and I will update if this does become officially supported.
There can be a huge data transfer reduction using data seeding, however there is a trade off. Data Seeding with vCloud Air-DR is done using vCloud Connector’s copy feature. This copy process requires that the machine you are moving is powered off in order to copy it. The process can take some time to run via the internet or even as an ODT (Offline Data Transfer) so the notion of having to power off the machine can be painful. The idea here was presented by a partner to me and got me thinking was “what if we cloned the machine first while running, then used vCloud Connector to copy it and configured the replication seed from that cloned and copied version?”
NOTE: You can actually do multi-select for data seeding I updated this post with a screen shot.
In order to fully compare the final results I needed to do a few things for baseline tests for my own education.
- Do a full ground up replication to establish an initial sync time
- Do a vCloud Connector Copy of the actual machine powered off with a data seed replication to get a sync time. (This requires copying the machine to a vCloud Air-DR catalog you must create and deploying it to the cloud.)
- Live Clone the machine in vCenter with a temporary name, copy it into vCloud Air-DR with the original name, then do a data seed and compare all the results. (This also still requires copying it to the catalog, then deploying to the cloud.)
Full Ground Up Replication
The real catch here is comparing the results to see if the seeded option works and the data seed sync time is in fact reduced. On initial sync over the internet it transferred about 14GB of data, the usage of the virtual machine on disk. It will checksum the entire disk itself which in this case was configured for 50GB, but it will only transfer what is actually in use on disk. As we know even though you configure 50GB vSphere may not be using all of it yet on disk.
You can see below during the sync there is the full amount of data in the transfer process. I can compare this in the seeding process as well and you will see that it’s very different.
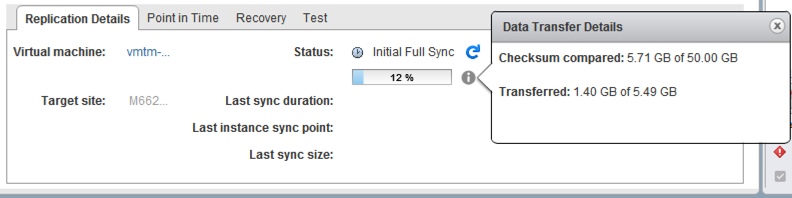
NOTE: The initial sync time in this process took 68 minutes but transferred a total of ~14GB of data.
Traditional vCloud Connector Data Seeding
For this process I needed to shut down the machine, copy it to the vCloud Air Catalog, and deploy it to the cloud so it would appear for use as a seed. There is a couple of things I noticed in the process
- Machines replicated from scratch are given a unique identifier when created, vCC based deployments are up to the user to create the template and vApp name in vCloud Director
- The “System” owns the “from scratch” machines and the user that did the deployment from template or vCC copy owns the machine in vCloud Director
- Stopping replication does NOT remove the seeded virtual machine from vCloud Air-DR like stopping does on a ground up replication. it will remain deployed to the cloud and in the catalog until you remove the items, that is if you decide you want to fully remove replication.
What I can say is the amount of data transferred was significantly different. For this seed it transferred only about 7.32MB of data. The checksum process still takes time to complete on the entire machines, but there is a significant amount of data transfer reduction over the wire. You can see this below during the initial sync process. What this means is the checksum still needs to take place but that plus the small amount of data processed is a reduction in overall initial sync time.
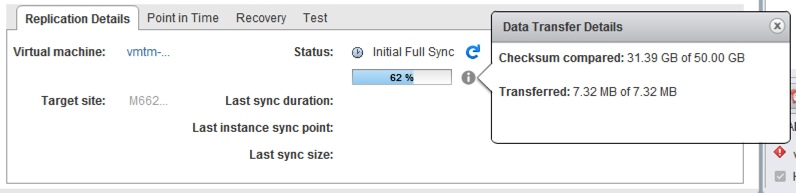
NOTE: The initial sync time in this process took 71 minutes BUT transferred a total of 7.32MB of data.
This process is fully supported as part of the Data Seeding of course. Although the time to process the checksum was still significant and close to the original the real message is the amount of data transferred was drastically reduced. Now to examine the live clone with vCloud Connector Data Seeding.
Live vSphere Clone With vCloud Connector Data Seed
As a reminder this is currently unsupported, but I wanted to get it documented as a possibility until I can get some kind of support statement. At this point the process will be similar to the second one with the exception I did a vSphere live clone of the machine first. Then I used vCloud Connector to copy the live clone up to vCloud Air-DR and deployed it for use as a seed. option. The expectation is the resulting initial sync will be similar to the traditional method, the difference is you can export the cloned copies of the machines for use with Offline Data Transfer so you don’t have to take the downtime. This is currently also being tested for supportability so at this point it’s technically unsupported, but I wanted to see if it worked, that is after all what I have a lab for! The process is simple and looks like this.
- Take a live clone of the VM in vSphere (No customization, do not even power on)
- Use VCC to offload the cloned data to vCloud Air-DR (For a real customer and large data this would use ODT)
- Deploy the VCC machine imported into template to the cloud for use with seeding (with ODT this would be done for you, for testing you can now deploy from VCC to the cloud as part of the import process and disable any guest customization)
- Configure vSR replication to cloud using Data seeding for each Machine cloned/imported
- Repeat for each VM that needs a seed
- Remove the vSphere clones from disk
Remember for a real use case the data for each machine would be sent to the ODT appliance and sent back to VMware for import into the cloud. The only thing you really need is enough storage on premises to handle the clones so you might need to do it in batches. Clone and copy a batch to the appliance, delete the clones, and repeat to save storage. Either way it’s just a process you need to repeat. You can see below that the initial sync started the same as the other copy and the data change was even different as the machine had some more data changes between the live clone, the copy, and the start of the replication
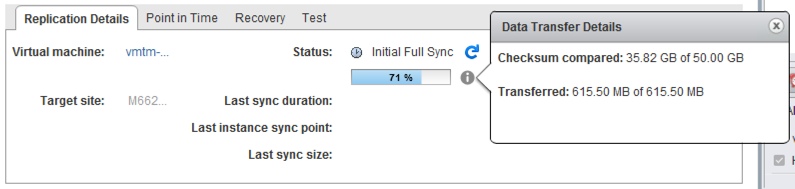
NOTE: The initial sync time in this process took 65 minutes BUT transferred a total of 617.546MB of data.
This workaround gives you the ability to now seed the replication using Offline Data Transfer without the need to power off the source machine! I should also point out this works with vCloud Air-DR because vSphere Replication ignores disk uuid values for replications to vCloud Air when using initial copy, only disk count and size is checked. It only validates them when using initial copies for vCenter-to-vCenter replications.